So in case you are like “seriously wtf is the Met Gala”, let’s just jump right in with a refresher: The Met Gala is a fundraiser for the Metropolitan Museum of Art’s Costume Institute hosted by Anna Wintour. It’s a Fashion Thing. And every year, Anna Wintour trolls all of Hollywood by giving it a theme that is basically an opportunity for them to look like idiots, or in last year’s case, probably be racist.
A lot of celebs half-ass the theme, because they don’t want to look stupid. But then they look sort of stupid for not showing up on theme. So basically Anna Wintour is as wonderfully evil as The Devil Wears Prada made us think she is.

Our future’s looking bright, guys!

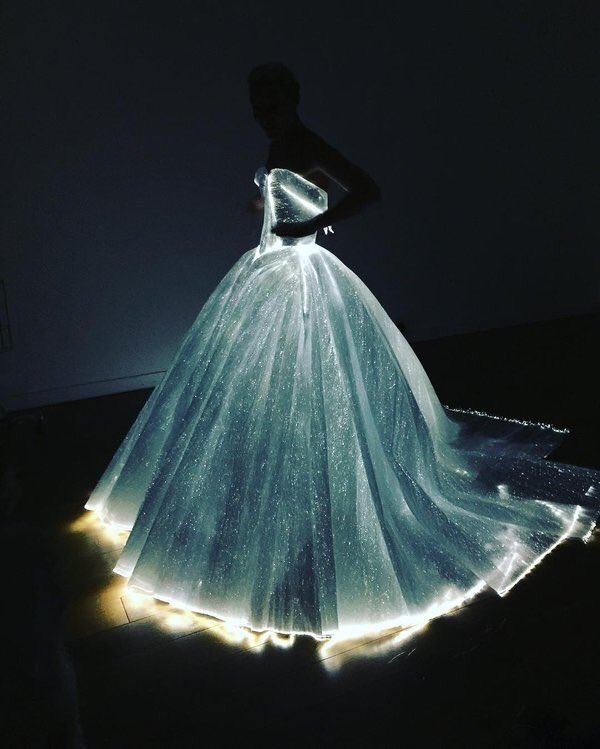
This wins all red carpets ever. It perfectly encapsulates the theme; it’s flawless in the light AND in the dark. So do we all just go home now orrr…..?

I heart this dress (which I’ve only ever seen at GCGme.com on the store page) and felt it didn’t get nearly enough attention. That train is just. JUST. UGH. And the simple black bodice and sleek hair were perfectly styled. She is a freaking peacock. I want one opportunity in my life – ONE – to walk up some stairs in a dress like this.
That said, it takes second place for me only because it wasn’t really on theme like Claire’s.

When I originally saw this, my jaw dropped to the floor. I got to Googlin’ to see who made it, and found out it was actually a pant suit? Which made me *kinda* sad until I read that it was made completely of recycled plastic bottles which made my jaw drop AGAIN. Because this might be the most creative interpretation of the theme. And probably I wouldn’t have loved it at any other event. But for this particular event, I’m here for it.

Another favorite: Karolina’s “Cognitive Dress” was designed by Marchesa and IBM and featured lights that changed colors according to reactions from her social media accounts. This was a super cool idea that could’ve ended badly in execution, but this dress would’ve been one of my favorites without the lights. So, win!

I’m usually the first person to roll my eyes at Kate Hudson on the red carpet. Something about Versace in general, but especially on her, gives me some pretty hardcore mall-store vibes. But this was so weird and pretty and perfect on her.


Props to these ladies for arriving on-theme and looking hot, but unless your metal dress gets a good Wifi signal, I’m deducting points for lack of creativity.

When you’re still holding out hope for that Practical Magic Netflix reboot.
(I love this dress tho)

I wobble back and forth between loving and not loving this dress. It’s gorgeous and she looks great in it, but it shows just a skosh too much of her hip area for me to be totally on board.

Zayn looks like a futuristic gladiator, and Gigi looks like the sexy legal property of a futuristic gladiator.

Dress: YES. Wig: Backwards.


“Hello there, sweetie. Come look at what I knitted for you! I’m not a regular grandma, I’m a cool grandma!”

The shape and artistry of Bey’s latex dress is a true example of “Manus x Machina”- BUT (and I will not post a photo here because I do not want to sully the image of Our Queen that you’ve undoubtedly built up in your mind) in close ups of her in this, she is sweating to an UNCOMFORTABLE degree. AS WE ALL WOULD. The sweat is running down the inside of the dress, and the material is stuck to her skin. There are photos where *ahem* parts of her are literally fogging up the dress. Like, there’s a reason she held her clutch in that spot all night. I imagine her trying to go to the bathroom and something like this happening:


Emma Stone looks sexy but also like she’s really into Dungeons and Dragons cosplay, which means there’s a nerd somewhere with only two wishes left.

Can I crop the top two inches off this photo and say I love it? Because I love the dress and the color and Lupita, but y’all, I just can’t with that hair.

Person: “This technology-themed Met Gala is gonna be a hot topic on the web tomorrow!”
Taylor, looking up from her iPhone: “Hot Topic theme? I got this.”

When you find out your ex is gonna be at the Met Gala and the only way you can deal is to get really high first.

When you find out your ex is gonna be at the Met Gala and the only way you can deal is to get really high first.


INTERLUDE FOR PICS OF CELEBRITIES’ TEENAGE KIDS THAT WILL MAKE YOU FEEL UNCOMFORTABLE.

How does that old saying go? “Those who seek attention wear the shiniest outfits.” Yeah, I think that’s the one.

I don’t know what the HAIM sisters are wearing but if you don’t cover your ears when they start singing, your soul will be trapped in the body of a woodland creature for an indeterminate amount of time.

When your sister drops the dopest album of the decade and you gotta represent that in dress form.

Alicia Vikander’s dress looked like someone tried to upcycle one of those oversized bikini t-shirts, but failed quite miserably.

Teen Witch alternate ending: Louise shows up to prom in this outfit and tells Brad she’s leaving him to pursue her dream of being a rock star and tbh she can’t have some high school jock dragging her down.
But not before having one last badass dance scene. It’s her finest hour, after all.


INTERLUDE FOR PICS OF CELEBRITIES WHO THINK THE FUTURE/TECHNOLOGY JUST MEANS POSING LIKE A ROBOT?

Kerry looks like she ransacked the sale bin at the Halloween Super Store. Like I’m honestly a little offended at how bad this is?

When u mad cuz u found out Cinna designed Claire Danes’ dress and u gotta wear something from some no-name Capital designer.

“Yes, hello, is this the line for Hamilton auditions?”

“Dear Lord. I said a loose interpretation, not to go full android.” – Anna Wintour probably


I mean, listen, we’ve all got our Jon Snow fantasies, but the Met Gala is not an appropriate place to act out your Game of Thrones erotica fan fic, babe. Leave that weird shit at home.
In closing:


